
I make grave mistakes all the time... everything seems to work out.
Part 1
TLDR
Cobra, Viper, and Bubbletea are fantastic Go libraries that are worth checking out for your next CLI application!
Boa makes your Cobra help and usage pretty and interactive using Bubbletea!
Intro
In this series, we will be building a command line application with Cobra, Viper, and Bubbletea called Rekall or rkl for short. Along the way, we will be walking through how to use the above tools and show how they can be leveraged together to create power command line tools.
Part 1 of this series will focus on getting a command structure defined and defining a few terminal UI styles that we will leverage to customize our command line application. We will largely focus on how these packages can be used together. If you would like to learn more about any of these packages, I would highly recommend starting with the documentation they provide, it is a fantastic starting place!
Let the charming begin!
Faint flute sounds begin emerging from the background.
What is Rekall?
rkl is an application that I have had floating around for a few years. Its purpose is to help me remember and manage easily forgotten information from the cli. For me, this includes past commands, todos, and other various notes. As time goes on, I'm sure the responsibility of rkl will have to grow.
I will be building this app through a series of posts. You can keep up with the progress here.
As mentioned above, we will be using a few awesome Golang libraries to do the majority of the heavy lifting.
Core Dependencies
We will be primarily using 3 core dependencies Cobra, Viper and Bubbletea.
Cobra is a library providing a simple package to create powerful modern CLI interfaces similar to git & go tools. Notable features include subcommand support, automatic help generation, flag inheritance, and other customizable components.
Viper, on the other hand, is a complete configuration solution that supports various config file formats, reading environment variables, reading command line flags, and countless other useful features.
Cobra and Viper work seamlessly together to enable developers to focus on building awesome software rather than worrying about config formats or building command line parsers.
That said, we all know that a command line application is not complete without including stunning colors, text formatting, animations, ASCII art, and robust user input/output controls. This is where Bubbletea comes in.
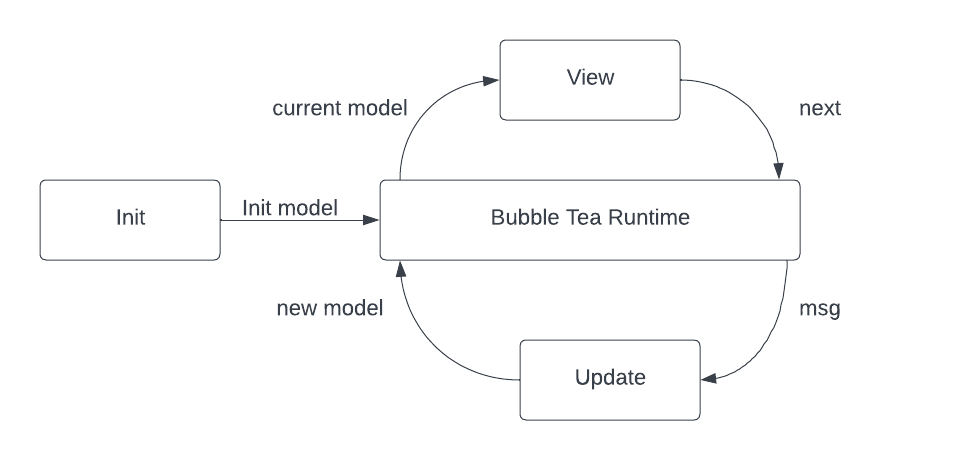
Bubbletea provides a functional and stateful way to build terminal apps. Bubbletea follows the Elm Architecture which, in its basic form, can be broken into 3 Parts.
- Model — the state of your application.
- View — a way to turn your state into text.
- Update — a way to update your state based on messages.
We will be implementing these components later on in this post. Before we do, let’s start getting some of the basic layouts of our applications defined.
Application Layout
We will be following the recommended project layout from the Cobra documentation. This consists of a main.go in the root directory and a cmd directory where we will add our commands.
.
├── LICENSE
├── README.md
├── cmd
│   └──  root.go
├── go.mod
├── go.sum
└── main.go
Our main.go file will remain very simple.
import (
    "log"

    "github.com/elewis787/rkl/cmd"
)

func main() {
    if err := cmd.Execute(); err != nil {
        log.Fatal(err)
    }
}
Here we are setting up our main entry into our command chain through a Execute() function located in our cmd package.
We will use the cmd package as the root package for all of our child commands. Our root command is described within our Execute() function and will be treated as the entry point for our application.
package cfg

import (
    "context"
    "errors"

    "github.com/spf13/cobra"
    "github.com/spf13/viper"
    "golang.org/x/sync/errgroup"
)

// Execute is the command line applications entry function
func Execute() error {
    rootCmd := &cobra.Command{
        Version: "v0.0.1",
        Use:     "rkl",
        Long:    "Rekall (rkl) is a CLI that helps you remember things. Easily manage past commands, todos and notes all from your command line.",
        Example: "rkl",
        RunE: func(cmd *cobra.Command, args []string) error {
            return nil
        },
    }

    return rootCmd.ExecuteContext(context.Background())
}
There is one major thing to call out here. We are slightly diverging from the example code provided by Cobra, most notability, the lack of init functions. We will be avoiding the use of init functions while creating our command chain largely to help compartmentalize our code and to allow for easier dependency injection for subcommands. We will see this manifest later on throughout the series.
Compiling the above code will provide a binary that takes advantage of Cobra's built-in help!
rkl % ./rkl --help
Rekall (rkl) is a CLI that helps you remember things. Easily manage past commands, todos, and notes all from your command line.

Usage:
  rkl [flags]

Examples:
rkl

Flags:
  -h, --help      help for rkl
  -v, --version   version for rkl
Now that we have the basic layout and root command defined, let's add our first subcommand!
Initialization Prompts
One of the features we will be adding to rkl is a pretty print for our bash history. An easy way to get this to work across various terminals is to have the user supply the location of their history file.
First, let's create a subcommand that will be responsible for prompting the user for any configuration data that rkl needs to execute. For now, this will only be to capture the location of the user's history file. We will add this subcommand to our cmd package and call it initialization.
package cmd

import (
    tea "github.com/charmbracelet/bubbletea"
    "github.com/elewis787/rkl/internal/tui"
    "github.com/spf13/cobra"
    "github.com/spf13/viper"
)

func initialize() *cobra.Command {
    init := &cobra.Command{
        Use:     "initialize",
        Short:   "init the rkl cfg.",
        Long:    "init provision the rkl configuration file.",
        Example: "rkl init",
        Aliases: []string{"i", "init"},
        RunE: func(cmd *cobra.Command, args []string) error {
            return nil
        },
    }
    return init
}
We can add this to our root command by adding the following line to our Execute function.
rootCmd.AddCommand(initialize())
Now we can re-run our help function and see that our initialization command has been added.
Rekall (rkl) is a CLI that helps you remember things. Easily manage past commands, todos, and notes all from your command line.

Usage:
  rkl [flags]
  rkl [command]

Examples:
rkl

Available Commands:
  completion  Generate the autocompletion script for the specified shell
  help        Help about any command
  initialize   init the rkl cfg.

Flags:
  -h, --help      help for rkl
  -v, --version   version for rkl

Use "rkl [command] --help" for more information about a command.
Note that we can also now use Cobra's built-in feature to generate an autocompletion script!
Now that we have these commands hooked up together, let's unpack our terminal user interface that will handle displaying the prompt.
TUI Components
We will start by creating an internal tui package that will hold all of our terminal display code.
Below is what our project structure looks like.
├── LICENSE
├── README.md
├── cmd
│   ├── initialize.go
│   ├── root.go
├── go.mod
├── go.sum
├── internal
│   └── tui
│       └── initprompt.go
├── main.go
Our initprompt.go file will leverage Bubbletea to create an interactive user prompt. To get this to work we first need to implement a Bubbletea Model. Earlier in the post, we unpacked how Bubbletea follows the Elm architecture. In Bubbletea, the Model contains the program's state as well as defines the core functions. The functions that we need to implement consist of:
Init() cmd: First function that will be called.Update(msg) (Model,Cmd): Called when a message is received.View() string: Renders the program's UI and is called after every Update.
Bubbletea Example
Before we dive into the implementation of our model we will first take a look at the Bubbletea examples. The Charm team has done a fantastic job at providing dozens of easy-to-follow examples that we can reference while building out the application.
For now, we will focus on the textinput example.
package main
// A simple program demonstrating the text input component from the Bubbles
// component library.

import (
        "fmt"
        "log"
        "github.com/charmbracelet/bubbles/textinput"
        tea "github.com/charmbracelet/bubbletea"
)

func main() {
        p := tea.NewProgram(initialModel())
        if err := p.Start(); err != nil {
                log.Fatal(err)
        }
}

type tickMsg struct{}
type errMsg error

type model struct {
        textInput textinput.Model
        err       error
}

func initialModel() model {
        ti := textinput.New()
        ti.Placeholder = "Pikachu"
        ti.Focus()
        ti.CharLimit = 156
        ti.Width = 20

        return model{
                textInput: ti,
                err:       nil,
        }
}

func (m model) Init() tea.Cmd {
        return textinput.Blink
}

func (m model) Update(msg tea.Msg) (tea.Model, tea.Cmd) {
        var cmd tea.Cmd

        switch msg := msg.(type) {
        case tea.KeyMsg:
                switch msg.Type {
                case tea.KeyEnter, tea.KeyCtrlC, tea.KeyEsc:
                        return m, tea.Quit
                }

        // We handle errors just like any other message
        case errMsg:
                m.err = msg
                return m, nil
        }

        m.textInput, cmd = m.textInput.Update(msg)
        return m, cmd
}

func (m model) View() string {
        return fmt.Sprintf(
                "What’s your favorite Pokémon?\n\n%s\n\n%s",
                m.textInput.View(),
                "(esc to quit)",
        ) + "\n"
}
There is a fair amount to this example but let's start from the beginning by looking at how we initialize the example model.
func initialModel() model {
        ti := textinput.New()
        ti.Placeholder = "Pikachu"
        ti.Focus()
        ti.CharLimit = 156
        ti.Width = 20

        return model{
                textInput: ti,
                err:       nil,
        }
}
Right away we can see that we are creating an object by calling textinput.New() and by looking at the imports we can see that this is coming from the package "github.com/charmbracelet/bubbles/textinput. Bubbles is a package that contains a handful of awesome pre-built Models that we can leverage. We can wrap this model in our implementation to trigger what the textinput model renders. In this case, we have set a few default values for the textinput model, such as the width, character limit, and initial placeholder text.
Continuing through the file, the next function to evaluate is the Init function.
func (m model) Init() tea.Cmd {
        return textinput.Blink
}
Remember that the Init function is the first function that will be called by Bubbletea. Init simply returns a tea.Cmd which is a function that defines an IO operation that returns a message. The message that is returned is then used by the Update function. Here we are using the cmd textInput.Blink which sends a message to our models Update function.
func (m model) Update(msg tea.Msg) (tea.Model, tea.Cmd) {
        var cmd tea.Cmd

        switch msg := msg.(type) {
        case tea.KeyMsg:
                switch msg.Type {
                case tea.KeyEnter, tea.KeyCtrlC, tea.KeyEsc:
                        return m, tea.Quit
                }

        // We handle errors just like any other message
        case errMsg:
                m.err = msg
                return m, nil
        }

        m.textInput, cmd = m.textInput.Update(msg)
        return m, cmd
}
By default, we can see that if the msg is not a tea.KeyMsg or a errMsg that we will fall through to m.textInput.Update(msg) which passes the current msg down to the textInput models Update function and instructs the textInput View function how to display the textInput model. This takes us to the last function of our model, View.
func (m model) View() string {
        return fmt.Sprintf(
                "What’s your favorite Pokémon?\n\n%s\n\n%s",
                m.textInput.View(),
                "(esc to quit)",
        ) + "\n"
}
Here we can see that we are simply returning a string that is built using our text of What’s your favorite Pokémon? and the text that is returned from m.textInput.View()!
In summary, this means that we first call Init() which generates a textinput.Blink msg. Then we process the msg in our Update() function. Lastly, our view function would be called, which would build a string based on the current state of our model and, in this case, the textinput model.
Keeping the following simple lifecycle in mind when developing with Bubbletea may be helpful.
Now that we have a solid example to reference, let's build our initial prompt model.
Prompt Model
First, we will lay out the skeleton of our model.
type InitPromptModel struct {
}

func (i InitPromptModel) Init() tea.Cmd {
    return nil
}

func (i InitPromptModel) Update(msg tea.Msg) (tea.Model, tea.Cmd) {
    return nil,nil
}

func (i InitPromptModel) View() string {
    return ""
}
Next, we will define the state of our Model.
var _ tea.Model = &InitPromptModel{}

const (
    histKey = `History File Path`
)

type InitPromptModel struct {
    inputs  map[string]textinput.Model
    done    bool
    cfgPath string
}
Here, we will be using a map of textinput models in case we extend our prompt, a done boolean to let our users know they are finished, and a config path that will be used to write our config file to a given location. We have also defined a compile check to ensure we are satisfying the Model interface and a const key that is used from our textinput model.
We can create our model by calling a new function as follows:
func NewInitPrompt(cfgPath string, userHomeDir string) *InitPromptModel {

    historyFilePrompt := textinput.New()
    historyFilePrompt.Placeholder = userHomeDir + "/.history"
    historyFilePrompt.Focus()
    return &InitPromptModel{
        cfgPath: cfgPath,
        inputs: map[string]textinput.Model{
            histKey: historyFilePrompt,
        },
    }
}
We will use the same code as the example above for our Init() function.
func (i InitPromptModel) Init() tea.Cmd {
    return textinput.Blink
}
Our update function also matches the example except for the addition of the done boolean, which we set when the user has pressed the enter key and the updateInputs() function. This function is used to focus on a given textinput model and will be useful when we add more prompts to our application.
func (i InitPromptModel) Update(msg tea.Msg) (tea.Model, tea.Cmd) {
    switch msg := msg.(type) {
    case tea.KeyMsg:
        switch msg.String() {
        case "ctrl+c", "esc":
            return i, tea.Quit
        case "enter":
            i.done = true
            return i, tea.Quit
        }
    }
    cmd := i.updateInputs(msg)
    return i, cmd
}

func (i *InitPromptModel) updateInputs(msg tea.Msg) tea.Cmd {
    cmds := make([]tea.Cmd, 0)
    for k := range i.inputs {
        if i.inputs[k].Focused() {
            m, cmd := i.inputs[k].Update(msg)
            i.inputs[k] = m
            cmds = append(cmds, cmd)
        }
    }
    return tea.Batch(cmds...)
}
Lastly, our View function is defined below.
func (i InitPromptModel) View() string {
    // Write output file
    if i.done {
        v := i.inputs[histKey]
        if v.Value() == "" {
            v.SetValue(v.Placeholder)
        }
        config := &cfg.Config{
            HistoryFile: v.Value(),
        }
        err := cfg.ToFile(i.cfgPath, config)
        if err != nil {
            return err.Error()
        }
        return "Initialization complete! \n"
    }
    output := strings.Builder{}
    // Write input to screen
    for k, v := range i.inputs {
        output.WriteString(k + "\n")
        output.WriteString(v.View())
    }
    return output.String()
}
The main call-outs here are the done variable check. When the user presses enter we update our done value to true. This is then used within our View function to trigger writing our configuration file to disc, and return Initialization complete to the user.
Now that we have implemented our model, we can add it to our initialization command that we defined earlier.
Final Command
Using our Bubbletea model in Cobra is pretty straightforward. However, before we finish our commands we have a few additional items to take care of.
First, we need to finish building out our root command. For now, we will define a PersistentPreRunE function that will check to see if a rkl configuration file can be found in the user's home directory. Additionally, we need to add a flag to allow the user to define the location of the configuration file. For this, we will use a combination of Cobra flags and Viper to access the values that are set.
Below is our Execute function.
    // Execute is the command line applications entry function
func Execute() error {
    rootCmd := &cobra.Command{
        Version: "v0.0.1",
        Use:     "rkl",
        Long:    "Rekall (rkl) is a CLI that helps you remember things. Easily manage past commands, todos and notes all from your command line.",
        Example: "rkl",
        PersistentPreRunE: func(cmd *cobra.Command, args []string) error {
            if err := viper.BindPFlags(cmd.Flags()); err != nil {
                return err
            }
            viper.AutomaticEnv()
            viper.SetEnvPrefix("rkl")

            if _, err := os.Stat(viper.GetString(cfgPath)); errors.Is(err, os.ErrNotExist) {
                return errors.New(err.Error() + ": please run init to configure rkl\n")
            }
            return nil
        },
    }

    dir, err := os.UserHomeDir()
    if err != nil {
        return err
    }

    //Define root flags
    rootCmd.PersistentFlags().String(cfgPath, dir+cfgDir+cfgFile, "location of the rkl config file")

    return rootCmd.ExecuteContext(context.Background())
}
The use of the PersistentPreRunE will execute before all children command with one caveat, any child command that defines their own PersistentPreRunE will overwrite the parents. We will see this in action next when we implemented our initialization command. We also make a call to Viper to bind the global viper instance to our commands flags. This allows us to easily access any of the flag values defined on our commands.
Lastly, we will define our initialization command.
func initialize() *cobra.Command {
    init := &cobra.Command{
        Use:     "initialize",
        Short:   "init the rcl cfg.",
        Long:    "init provision the rcl configuration file.",
        Example: "rkl init",
        Aliases: []string{"i", "init"},
        // used to overwrite/skip the parent commands persistentPreRunE func
        PersistentPreRunE: func(cmd *cobra.Command, args []string) error {
            // Bind Cobra flags with viper
            if err := viper.BindPFlags(cmd.Flags()); err != nil {
                return err
            }
            // Environment variables are expected to be ALL CAPS
            viper.AutomaticEnv()
            viper.SetEnvPrefix("rkl")
            return nil
        },
        RunE: func(cmd *cobra.Command, args []string) error {
            homeDir, err := os.UserHomeDir()
            if err != nil {
                return err
            }

            if err := tea.NewProgram(tui.NewInitPrompt(viper.GetString(cfgPath), homeDir)).Start(); err != nil {
                return err
            }
            return nil
        },
    }
    return init
}
Again, note that we are overwriting our root command PersistentPreRunE. This is to prevent our application from checking for the configuration file before we have had a chance to create it.
In our RunE function, we can see how we are creating and calling our TUI model.
    if err := tea.NewProgram(tui.NewInitPrompt(viper.GetString(cfgPath), homeDir)).Start(); err != nil {
        return err
    }
Our final step is to add this command as a child to our root command back in our Execute function.
rootCmd.AddCommand(initialize())
Compiling and running our code produces the following:
Summary
Whew, we accomplished quite a lot in this post!
We set up the initial skeleton of our application, created a package for our tui model implementations, implemented a user prompt, and stitched everything together using our root and initialization commands. All of the code for this article can be found here.
In the next post, we will build a tui model that will read our bash history file and pretty-print the output.
If you liked this article consider following me on Twitter or my other social accounts so you don't miss out on part 2 of this series!!
Bonus
I have had a lot of fun working on this post. So much so that I decided to write my own component for Bubbletea and Cobra aptly named Boa.
Boa takes advantage of Cobra's flexibility by extending the help and usage to be interactive.
Using boa is easy! You can set the Cobra help and usage function to use Boa by adding the following lines
    rootCmd.SetUsageFunc(boa.UsageFunc)
    rootCmd.SetHelpFunc(boa.HelpFunc)
That's it!!
Here is what Boa looks like in our application:
Combining Cobra and Bubbletea, in my opinion, is a great example of flexible and module code design. Huge thanks go to the creators and contributors of these fantastic packages !!
If you are interested in how Boa was made, please reach out to me on Twitter or my other social media sites. If we get enough interest maybe I will add a bonus post in this series!!!

